SUPER INSULATION RETROFIT: MOST HOMES, NEW OR OLD, NEED A TECHNOLOGY UPDATE OF INSULATION AND AIR SEALING of JOINTS, WALLS, ATTICS and FOUNDATION: (You can do the following to improve your existing home's insulation.)
======================================
2014- 2015:
Below: New ALPEN Series-9 Windows are installed after removing the outdated windows. After removing the old window, prepare the window jam for new windows by sealing all joints with SIGA Wigluv tape for superb air tightness. The new window will have a good surface to seal to versus the the old construction methods with little or no preparation:

See more details about window installation and Infrared photo comparison below..
---------------------------------------------------
Our current improvement project is doubling the thickness and R value of exterior walls and Installing Super Alpen Series-9 windows certifed at U-0.12. The house will have 5 to 7 inches thick of PolyIso with almost no Thermal bridging plus Very High R value Windows from ALPEN. Alpen has the most Winter Heating Climate Zone Passive House certifications of any USA window manufacturer, similar to the manufactures of Canada and Germany.
ABOVE: Mounting 5 inch thick foam panels into place with OSB glued to it. The panel is screwed to the house 2x4 walls with 8 inch long FastenMaster "Headlok" screws.
Below: Across the top and bottom, blue masking tape marks the location of original 2x4 boards at 16 inch OC (On Center) intervals. See the black head of each screw every 16 inches vertically and horizontally plus the yellow expanding foam to fill the gaps around each panel:


-----------------------------
Below: Seal All nail Holes and CORNERS before adding Foam Panels. This step will produce a good Blower Door test = hopefully less than 1 air exchange per hour at ACH50 (simulates a 24 mile per hour wind outside). Treat house like a car tire. SIGA tape was used:

Mounting more 4x8 panels of POLYISO Foam:

-
DRAINAGE WRAP (Blue color) required by City Code, NOTE: NO STAPLES or nails are USED which would have created new air leaks. The Wrap is hung using SIGA WIGLUV TAPE only. I am using an vapor-permeable, air tight wrap called MajVest, manufactured by SIGA, imported by AE Building Systems, Golden CO. 720-287-4290 :

MOST IMPORTANT: SHARE KNOWLEDGE WITH OTHERS (BELOW). Interest was high during Public Open Houses held on Saturdays Aug 23rd and Aug 30th. See https://www.facebook.com/ColoradoRenewableEnergySociety
AUG 23rd, OPEN HOUSE Educational CRES construction volunteers plus AE Building Systems SIGA Tape demonstration with Todd Collins and Mark Attard:

-
AUG 30th OPEN HOUSE Educational CRES construction volunteers:

--Remove Siding:

--Paint and smooth out old nail marks. Using a FEIN blade makes shaving job go fast:

For Reduced Thermal bridging, remove old nails:

--TAPE and SEAL ALL NAIL HOLES AND SEAMS:

-EXPANDING FOAM:-Large gaps are filled with GREAT STUFF (Blue can) before taping:

---All ages can help:

--Sand uneven surfaces plus screw heads before caulk: (Note new thick wall at front door)

---
Sanding protruding screw heads for a smooth paintable surface:

----------------------------------------------------------------------------
West Wall above DECK:
SUPER INSULATION IS DONE IN PHASES PER LOGICAL SECTIONS OF THE HOUSE TO REDUCE WEATHER EXPOSURE OF HOUSE WALLS:

SMART HOME ETHERNET WIRING CAN BE DONE AND HIDDEN BEHIND NEW FOAM PANELS:

ADDING FOAM PANELS:

FINAL LOOK WITH SIDING:
![]()

------------------------------------
2015: KITCHEN EAST WALL January 2015: The East wall was Super insulated to 8 inches of PolyIso using the same contractor who insulated the outside or my basement Foundation Insulation in 2013 (pictures at bottom): R&R Concrete Residential and Commercial, 1502 Collyer Street, Longmont CO 80501
Rene Robles President rrconcretell@gmail.com 720 327 9402
Labor and paint done by R&R Concrete. FINISHED IN 11 DAYS:
Measuring the Thickness of new PolyIso R-50 protruding out past window Frame. Aluminum siding was used as FLASHING to cover the very wide window sill and window jam. The sill is tilted down for watershed and tucked up under the window frame to the nailing fin:

EAST WALL: SCAFFOLDING while mounting 7 new inches of PolyIso:

EAST WALL: Apply blue SIGA MEMBRANE WRAP "MAJVEST" imported from SWITZERLAND by: AE BUILDING SYSTEMS, Todd Collins, Golden CO and Mark Attard (720) 287-4290

------------------------
2015: (AFTER) South East view after retrofit to R-55 walls and Alpen Series-9 windows. * Note the thick white window sill around the east window. This wall is 12 inches thick of PolyIso after retrofit:
![]()

---------------------------
SOUTH WALL (THE LAST WALL to SUPER INSULATE)
WINDOWS: ALPEN SERIES 9 WINDOWS ADD U-0.12 INSULATION AND Excellent Air SEALING:
Marc Prades (CU Triple Engineering Graduate) pulls old trim and window out:
-------
Marc Prades displays empty window jam:

-----
Marc seals open window jam with SIGA WIGLUV TAPE:
John Avenson and Marc Prades display two new ALPEN Series 9 windows:

Winter: This IR picture compares the heat-escape between the new ALPEN window U-0.12 (Right side) and the two old triple pane windows U-0.3 from 1981:
ccc
--------------------------------------------------------------------------
FOUNDATION Insulation 2011-2013:
In 1981, This house foundation was originally built with 1 inch thick PolyIso (R5) panels located between the cold winter dirt and the cement foundation. This was a great concept for 1981 but NOT enough R value to do the job. The cement still had heat loss throughout the Winter. The following pictures show the old foam removed and newly installed 4 inch thick PolyIso installed which is about R27. The result is a 12 degree warmer basement east wall for 2011/2012 as compared to the un-improved basement west and north cement walls. With incentive from Steve Stevens of Golden who dug up his entire foundation to add foam, I finished the rest of my foundation in 2013 but had to chop out the sidewalk to do it. See pictures below:
Step 1: Dig out dirt from foundation (Eastern Wall) (The Help = Ballroom Dance partner Sarah Boe)

================
Step 2: Narrow dig hole about 4 feet deep for new foam PolyIso panels (4 inches = R27) (NOTE: Great Stuff expanding foam is used to seal air gaps to foundation). Progress was about 8 feet a day.

Step 3: Backfill, Protect top boarder of foam from Weather with TAR and/or Aluminum Duct Tap

==== RESULT Below: 1) BEFORE: January Temperature of cement inside basement is 46.4 before PolyIso was installed: (NOTE: Outside temp = 7 Farenheit, -13 Celsius)
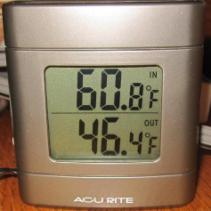
2) AFTER: The PolyIso installed raised the temperature of the cement foundation at near room temp:

The inside temperature (OUT PROBE) of the basement cement now wants to be near "room temperature" instead of at the frozen "dirt temperature" outside.
BELOW PICTURES: THE VALUE of "OUTSIDE Insulation" IS SO COMPELLING that I invested in a contractor to chop out the north and west sidewalks and install PolyIso to the rest of the house:
BASEMENT FOUNDATION 2013: CHOPPING OUT Northwest SIDEWALK CEMENT: Contractor hired: R&R Concrete LLC (Rene Robles) Excellent Job.

Trench dug out, with 4 inch thick PolyIso glued and sealed to foundation cement:
(This 4 inch PolyIso replaces the original 1 inch originally installed in 1981.)

Expanding foam "Great Stuff" has high glue content which holds panels to foundation and seals out any possible moving air:


Dirt is backfilled and tamped down, and new sidewalk is installed:


NEXT STEP FOR NEAR FUTURE:
The new top surface of the four inch inch thick foundation PolyIso will serve as the "floor" for four inches of new PolyIso to be installed behind the upper siding clap boards. 2014: The Siding will be removed, 4 inches of PolyIso will be added using very long screws to reach the wood 2x4 studs and then the sideing will be re-mounted.
====================================
2010: Dense Pack Cellulose added:
TWO CONCEPTS IN WALLS R value: Insulation and Sealing:
1) Insulation: Latest government studies show most home insulation is not effective per the documented rating because the insulation is not installed properly. Unless insulation is pushed into all corners of a cavity and all batts were touching each other on all edges, the air WILL FLOW and conduct cold or hot directly into the house. Most builders do not insulate the house as if it were their own house (leaving gaps and cavities uninsulated). Instead they insulate as fast as possible to meet a deadline.
2) Sealing: Latest government studies show that leaking air is a worse problem than poor insulation. In the Winter, a home audit Infrared camera can show cold blue leaks for the entire length of a room where vertical sheet rock walls meet the horizontal ceiling/attic framing. Knee walls, floor joists and Cantilevers are also not sealed to their frame. In each room, the warm air will rise to your top floor or ceiling and pass through the "invisible" cracks. Cold replaces the warm air at the bottom levels of the house. This creates stratified cold air rooms at lower levels and warm air at the top of a room or upper floors. In winter, the "tiniest leaks" add up to a cold room within an hour or two.
THE FIX:
INSULATING: (1) PolyIso, (2) Dense Pack Cellulose, (3) Blankets
1) PolyIso Foam:
The ideal fix but Impractical and expensive is to spray PolyIso foam into the wall framing and window frames and possibly re-sheetrock the rooms. The PolyIso spayed foam will stop 100% of all leaks in the house. PolyIso is the highest R factor per inch (R7) compared to Cellulose and Fiberglass batts. PolyIso 4x8 foot "sheets" are much cheaper and can be cut to shape and added to the outer walls to make the outer walls thicker. (Available at Home Improvement stores and Secondary warehouses where contractors dump un-used material). Previously thought ridiculous values in past years, now an "R60" outer wall is excellent with R100 attics but the home owner must have a lot of enthusiasm to fit the PolyIso sheets and refinish their walls.
2) Economical FIX: Dense Pack Cellulose by way of the tube fill process to existing wall: Contractor Hired: http://www.bestwayinsulation.com/ (Excellent job)
One step down from PolyIso and MUCH easier to accomplish is to contract a "Dense Cellulose" insulation service to fill the home's outer walls and vaulted ceilings which stops air leaks and increases the effective insulation value. Example: A 2x4 wall with fiberglass batts rated at 13 has so many leaks and gaps that the wall is not R13 but effectively R9 or less. Enjoy the pictures below of BestWay Insulation performing a dense pack job on my home in January 2010:

DENSE PACK Cellulose: (not loose pack) The above Photo and lower photos demonstrate the service of "dense pack Tube Fill" for existing homes.
Existing homes can be "Re-insulated" and sealed after they were built to a much higher quality standard than originally insulated by the builder. The trick is to stuff new cellulose very tightly into the walls to reduce the air exchange of cold winter air. The loose characteristic of fiberglass makes it impossible to stop air flow. "Tube fill" will correct two birds in one shot: 1) Add R value and 2) Stop or reduce air leaks. By using a "tube fill" process through holes drilled into the walls, Cellulose can be tightly packed into outside 2x4 (or 2x6) cavities. This will compress the old fiberglass insulation against the wall and create a dense pack in it's place. IT IS THE INNER CORNERS AND CREVICES THAT COUNT! Pre cut Fiberglass batts installed by the original builder are not tight into corners therefore and air flows very well through your outer walls, unknown to the homeowner except to complain that the room is always cold. 
Above shows typical fiberglass that does NOT stop air leakage into the home.

 The above shows an installer stuffing the walls with dense cellulose. The installer shoves the hose all the way to the top (and bottom) of each cavity and works his way down inch by inch "by feel" when the air pressure from the hose can no longer push more cellulose into the top. Slowly the end of the hose comes out of the hole and the exit hole shows the cellulose pushing out the hole. The old fiberglass batt has been pushed against flat to make way for the dense packed cellulose.


In the two pictures above, drilling holes exposed cavities where the builder totally missed stuffing fiberglass! Remember, Builders are in a rush to move on to their next project and don't care about doing the best quality insulation job.

After stuffing the cellulose with the tube fill process, the siding is re-installed which covers the holes. Note that they can also go through brick walls as well as clap board homes.
--
SEALING of Air leaks:
"ENERGY COMPLETE" FOAM:
1) A new product called "Energy Complete" http://www.ocenergycomplete.com/ is engineered to spray just the right consistancy foam (pink) into the attic joints and other accessable joints in the basement or cantilevers. The foam comes out warm through long hoses from a machine the contractor has in your yard. Infrared camera photos before/after show a big improvement of no cold air leakage.
Step 1) Clear out all the old attic loose fill and batt insulation as shown.
![]()
Above: The flat cap board indicates a bedroom wall located below the attic. These flat boards provide structure to fasten sheet rock to, and need sealing to prevent warm air from coming up through tiny leaks into the attic. Note all Attic insulation has been removed by the contractor to prepare for the "EnergyComplete" spray foam.
==

![]()
![]()
Above: The contractor http://www.bestwayinsulation.com/ uses a gun from the machine out in the front yard (manufactured by Energy Complete) used to spay foam into the attic seams.![]()
![]()

Below: The pink Energy Complete foam is sprayed into cantilever cavities to prevent outside cold air from leaking into the house.![]()


Above:
After the Pink Energy Complete has sealed the deep end of the cantilever, the cavity is covered with a blue foam board. Then the tube fill process blows cellulose through the hole to completely fill the cavity and then the hole will be sealed with expanding foam spray.
![]()
3) FIBERGLASS BLANKETS:
Seal vertical Knee walls in attics by covering them with wide 8 foot blankets of Fiberglass. The fiberglass is blanketed in between the plastic outer layers. Today's blankets have silver sheets with R19 fiberglass.


ABOVE: The Knee wall is now sealed from moving air currents by the blanket rather than the original condition where the builder left the wall with exposed fiberglass batts. Without the blankets stopping air flow, fiberglass batts are almost ineffective for their job function of insulating.
==========================================
CONTRACTOR:
In Colorado, I contracted "BestWay Insulation" http://www.bestwayinsulation.com/ to bring my 1981 house up to the latest 2010 standards. BestWay did an excellent job of sealing up the house. They provided home air sealing with 1) ENERGY COMPLETE, 2) INSULATION BLANKETS and 3)DENSE PACK Cellulose. (NREL studies fully endorse these concepts for air sealing.)
The before and after blower door air exchange tests shows a significant reduction in air exchange. This house was reasonably tight to begin with, being a government project in 1981. The 2011 winter (colder than previous years) gas bill shows even less usage of the gas furnace over previous winters by several "therms" per month (1/5 reduction). A loose house (standard mass production home) could show a better reduction in the need for the furnace to run by perhaps 1/4 or more less therms, depending on other construction defects of hidden items such as chimney chases and window frame leaks.
BestWay specializes in the procedure for "DENSE PACK". Dense pack requires A LOT OF HUMAN MUSCLE POWER. First a hole must be drilled into every 2X4 (or 2X6) section of every wall and every Vaulted ceiling joist for the air hose to fit in. BestWay employees know where to drill in order to hide the holes as best possible after they are done. They can do brick walls and siding also.
They jam a stiff hose far into the corners of the wall cavities and slowly back out the hose as pressure builds up after re-jamming the hose a couple times to ensure no space was missed. The hose cuts and tears through the old loose fiberglass batts to get to the far corners. It is the corners that count to stop the house from leaking air. Outside, in the contractors truck, the blower machine is higher powered air flow than can be rented at Lowes or Home Depot.
Result: The old fiberglass is compressed against the wall as the cellulose fills the wall. The walls no longer exchange air with the outside, and the house will save energy because the furnace WILL run less and rooms are more comfortable, especially on a windy day.
Enjoy the pictures! The whole house, including the garage walls and attic took 3 days with many employees, many cords and hoses. Well worth the investment for my home approaching net zero!
MISC PICTURES:

Above: The very "high powered" blower machines provide a high enough force to get enough density into the walls and ceiling for "dense" pack.
Some spots may require a hole drilled directly through the siding rather than removing the siding. In this case, special plugs with a wedged bevel will be covered with caulk and will plug the hole and be tapped flush to the surface. The home owner must use matching house paint to cover the plug.
![]()
--

The picture above shows white cellulose dust that blew in during insulating. This reveals a hidden path where winter air previously would have found the same path to get into the house.
![]()
--

--ABOVE: Construction techniques of a home requires access to high reaching areas.

-Above and below: The patented EnergyComplete Spray Gun.

Above: The EnergyComplete machine (behind the pole) heats up and stirs the foam solution in the white bucket to 108 to 110 degrees in preparation for stringing the long hose through the front door up into the house attic, cantilevers, and basement walls, etc to seal joints in the house.
Below: EnergyComplete Machine which creates the Pink Expanding Spray foam (similar character to "Great Stuff" cans from Home Depot)
 --------
![]()

ABOVE. BestWay sealed off portions of the living area when pumping cellulose into holes in the ceiling. Access to the vaulted cavities was impossible from outside in some cases therefore holes had to be drilled in the interior of the living room.

THE ENERGY SAVING RESULT!
The following winter season 2010/2011 was colder than before but with my Dense pack, the gas heating bill was less by 1/4. Since this is a Passive Heated solar home, the gas furnace does not run most of the year. My before/after HERS rating moved down from 26 to 23 on a scale of 500 to 0 (net zero). My goal is to become net zero or below.
REMEMBER: The National Solar Home Tour happens in most states and cities on the last weekend of September or first weekend of October. You can experience what home owners have done to improve their homes energy efficiency. Find out more at: American Solar Energy Society: www.ASES.org or a member website from your state's energy society. Colorado = http://www.cres-energy.org/ click on tab "Events", "Solar Tour"